Tag Archives: winforms
Delete files or folders to recycle bin in C#
Sadly C# doesn’t have the required libraries in place to aid the users or the developers to send files or folders directly to the recycle bin. System.IO.File.Delete() and System.IO.Directory.Delete() simply delete the path without allowing for the action to be undone.
Luckily there are two ways this can be resolved. Either by using the Windows API SHFileOperation function or by referencing Microsoft.VisualBasic and using the Microsoft.VisualBasic.FileIO.FileSystem.DeleteFile() and Microsoft.VisualBasic.FileIO.FileSystem.DeleteDirectory() methods.
Personally I prefer the Microsoft.VisualBasic approach as the code looks much cleaner and is more readable to me but I will demonstrate how both methods can be implemented either way.
The Microsoft.VisualBasic approach:
Reference Microsoft.VisualBasic in your project and simply call
or
depending if you want to delete a file or a folder.
Posted in C#.
Tagged C#, csharp, delete, delete file, delete folder, SHFileOperation, SHFILEOPSTRUCT, snippet, winforms
Serialize an object to string and from string back to object
Serialization enables us to store or transmit data structures or objects. This can be done by converting the data to a textual representation when storing or transmitting them which also allows us to recreate the original object using the stored information.
Lets create a dummy class called Person, that will hold some basic information.
Keep in mind that your class needs to have a parameterless constructor in order to be serialized or else you will get an InvalidOperationException exception (cannot be serialized because it does not have a parameterless constructor) if you try to serialize a class without one. Luckily you can just set it to private or internal so it won’t be accessible from other classes.
Now it is time to serialize our Person object.
Posted in C#.
Tagged C#, csharp, deserialize string, serializate object, serializate to string, serialization, serialize, snippet, string to object, tutorial, winforms
How to create and connect to an SQLite database in C#
The aim of this tutorial is to teach you how to create a new SQLite database from scratch, create a new table in it, insert and read values from it. This is merely an entry level example to give you an idea on how to start.
First you will need System.Data.SQLite library from system.data.sqlite.org. Head over to their download section and download the libraries that best suit your need depending on the .NET Framework you want to target and the Windows bit version.
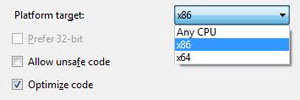
Extract the file and add System.Data.SQLite.dll as a reference in your project. Keep in mind that SQLite.Interop.dll also needs to be in your executables directory but doesn’t need to be added as a reference in your project. Moreover, if your application is targeting Any CPU it is likely that you will get an exception. So make sure to navigate to Project properties -> Build and set the Platform target to the bit version of the System.Data.SQLite.dll binary you have downloaded.
Finally, the snippet below should give you the general idea on the main functions you will need to learn first, mainly
- Creating a file for your database
- Creating a table in your database
- Inserting information in the database
- Retrieving information from the database
Monitor clipboard in C#
The best way of monitoring the data in the clipboard through your application is by adding your application’s window to the chain of clipboard viewers so it can receive the WM_DRAWCLIPBOARD message when the clipboard data is modified.
In order to do that we need to make use of the Windows SetClipboardViewer and ChangeClipboardChain APIs in order to monitor when the WM_DRAWCLIPBOARD message triggers.
First we will need to pinvoke SetClipboardViewer and ChangeClipboardChain and WM_DRAWCLIPBOARD and also set the variables that will hold the value for the next window in the chain that is required when we will want to stop our window from monitoring the clipboard. Place the following in your class.
Posted in C#.
Tagged C#, ChangeClipboardChain, csharp, SetClipboardViewer, snippet, tutorial, winforms, WM_DRAWCLIPBOARD


