Tag Archives: tutorial
Creating and connecting to a Microsoft Access Database programmatically in C#
The following example aims to get you a bit more familiar as to how to create and connect to a Microsoft Access database programmatically while being able to add any type of tables you want as well are inserting and retrieving data from it.
Firstly we will need to reference two libraries in our project. Microsoft ActiveX Data Objects 2.0 Library (Interop.ADODB.dll) which we will use to ensure that the connection to the database is closed after we are done creating it, and Microsoft ADO Ext. 2.8 for DDL and Security (Interop.ADOX.dll) which is needed to be able to access the classes that are required to create our database.
After you have finished adding those two references to your project you can use the code sample below to create the database file programmatically. Feel free to modify the code to suit your needs. Also please note that setting your project to Any CPU build will cause exceptions to be thrown when creating the database.
1 2 3 4 5 6 7 8 9 10 11 12 13 14 15 16 17 18 19 20 21 22 23 24 25 26 27 28 29 30 31 32 33 34 35 36 37 38 39 40 41 42 43 44 45 46 | public static void CreateAccessDatabase() { string connectionString = string.Format("Provider={0}; Data Source={1}; Jet OLEDB:Engine Type={2}", "Microsoft.Jet.OLEDB.4.0", "mydb.mdb", 5); ADOX.CatalogClass catalog = new ADOX.CatalogClass(); catalog.Create(connectionString); ADOX.Table table = new ADOX.Table(); table.Name = "Users"; // Table name // Column 1 (id) ADOX.ColumnClass idCol = new ADOX.ColumnClass(); idCol.Name = "Id"; // The name of the column idCol.ParentCatalog = catalog; idCol.Type = ADOX.DataTypeEnum.adInteger; // Indicates a four byte signed integer. idCol.Properties["AutoIncrement"].Value = true; // Enable the auto increment property for this column. // Column 2 (Name) ADOX.ColumnClass nameCol = new ADOX.ColumnClass(); nameCol.Name = "Name"; // The name of the column nameCol.ParentCatalog = catalog; nameCol.Type = ADOX.DataTypeEnum.adVarWChar; // Indicates a string value type. nameCol.DefinedSize = 60; // 60 characters max. // Column 3 (Surname) ADOX.ColumnClass surnameCol = new ADOX.ColumnClass(); surnameCol.Name = "Surname"; // The name of the column surnameCol.ParentCatalog = catalog; surnameCol.Type = ADOX.DataTypeEnum.adVarWChar; // Indicates a string value type. surnameCol.DefinedSize = 60; // 60 characters max. table.Columns.Append(idCol); // Add the Id column to the table. table.Columns.Append(nameCol); // Add the Name column to the table. table.Columns.Append(surnameCol); // Add the Surname column to the table. catalog.Tables.Append(table); // Add the table to our database. // Close the connection to the database after we are done creating it and adding the table to it. ADODB.Connection con = (ADODB.Connection)catalog.ActiveConnection; if (con != null && con.State != 0) con.Close(); } |
Serialize an object to string and from string back to object
Serialization enables us to store or transmit data structures or objects. This can be done by converting the data to a textual representation when storing or transmitting them which also allows us to recreate the original object using the stored information.
Lets create a dummy class called Person, that will hold some basic information.
1 2 3 4 5 6 7 8 9 10 11 12 13 14 15 16 17 | public class Person { public string Name { get; set; } public string Surname { get; set; } public int ID { get; set; } private Person() { } public Person(string name, string surname, int id) { this.Name = name; this.Surname = surname; this.ID = id; } } |
Keep in mind that your class needs to have a parameterless constructor in order to be serialized or else you will get an InvalidOperationException exception (cannot be serialized because it does not have a parameterless constructor) if you try to serialize a class without one. Luckily you can just set it to private or internal so it won’t be accessible from other classes.
Now it is time to serialize our Person object.
1 2 3 4 5 6 7 8 9 | Person aPerson = new Person("name", "surname", 1); // The Person object which we will serialize string serializedData = string.Empty; // The string variable that will hold the serialized data XmlSerializer serializer = new XmlSerializer(aPerson.GetType()); using (StringWriter sw = new StringWriter()) { serializer.Serialize(sw, aPerson); serializedData = sw.ToString(); } |
Posted in C#.
Tagged C#, csharp, deserialize string, serializate object, serializate to string, serialization, serialize, snippet, string to object, tutorial, winforms
How to create and connect to an SQLite database in C#
The aim of this tutorial is to teach you how to create a new SQLite database from scratch, create a new table in it, insert and read values from it. This is merely an entry level example to give you an idea on how to start.
First you will need System.Data.SQLite library from system.data.sqlite.org. Head over to their download section and download the libraries that best suit your need depending on the .NET Framework you want to target and the Windows bit version.
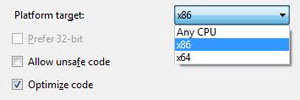
Extract the file and add System.Data.SQLite.dll as a reference in your project. Keep in mind that SQLite.Interop.dll also needs to be in your executables directory but doesn’t need to be added as a reference in your project. Moreover, if your application is targeting Any CPU it is likely that you will get an exception. So make sure to navigate to Project properties -> Build and set the Platform target to the bit version of the System.Data.SQLite.dll binary you have downloaded.
Finally, the snippet below should give you the general idea on the main functions you will need to learn first, mainly
- Creating a file for your database
- Creating a table in your database
- Inserting information in the database
- Retrieving information from the database
Monitor clipboard in C#
The best way of monitoring the data in the clipboard through your application is by adding your application’s window to the chain of clipboard viewers so it can receive the WM_DRAWCLIPBOARD message when the clipboard data is modified.
In order to do that we need to make use of the Windows SetClipboardViewer and ChangeClipboardChain APIs in order to monitor when the WM_DRAWCLIPBOARD message triggers.
First we will need to pinvoke SetClipboardViewer and ChangeClipboardChain and WM_DRAWCLIPBOARD and also set the variables that will hold the value for the next window in the chain that is required when we will want to stop our window from monitoring the clipboard. Place the following in your class.
1 2 3 4 5 6 7 8 | [DllImport("User32.dll", CharSet = CharSet.Auto)] public static extern IntPtr SetClipboardViewer(IntPtr hWndNewViewer); [DllImport("User32.dll", CharSet = CharSet.Auto)] public static extern bool ChangeClipboardChain(IntPtr hWndRemove, IntPtr hWndNewNext); private const int WM_DRAWCLIPBOARD = 0x0308; // WM_DRAWCLIPBOARD message private IntPtr _clipboardViewerNext; // Our variable that will hold the value to identify the next window in the clipboard viewer chain |
Posted in C#.
Tagged C#, ChangeClipboardChain, csharp, SetClipboardViewer, snippet, tutorial, winforms, WM_DRAWCLIPBOARD
UDP hole punching implementation in C#
UDP hole punching is a method that is used to establish connectivity between two hosts that are behind a NAT (router) without the need of having the clients port forward specific ports.
When the client sends a UDP packet to the server the router creates a temporary rule mapping, the server then uses the incoming IP address and port it receives the message from to send a message to the client, which refreshes (in most cases) the lifetime of the temporary mapping on the client’s router and allows the server to communicate constantly with the client without the need for the user to do anything from their side.
This method is also used to send messages between two users that are behind different NAT’s. The difference in the implementation is that the clients first contact with the server, which should have a port open in order to be able to receive the information from the clients. After the server receives the information from the clients it sends each client the IP and port of the other client, allowing both of them to communicate with each other.
I’ve created a small example on how the implementation of a UDP hole punching looks in C#, this should give you the general idea of how it works and let you expand it as you like. The example simply receives a message from the client then sends a response. If you want the server to handle more than one message then you will need to add some loops.


