Author Archives: CooLMinE
LinkBypasser++ released!
If you are one of those people that dislike clicking on redirect links which you don’t know were they will actually take you then I have the solution for you.
I’ve created LinkBypasser++ for the sole reason of finding out where the links redirect to before clicking them since it’s common practice to use those links to redirect people to malicious websites without them being suspicious of it.
The program currently supports the following domains:
- adf.ly
- tiny.cc
- goo.gl
- bit.ly
- owl.li
- ow.ly
- fb.me
- up.ht
- reut.rs
- lnk.co
- t.co
I will gladly add more on request, assuming it is possible to bypass that particular domain.
One of the main features of the program is that it’s possible to make it auto detect such redirection links upon copying the link from somewhere and placing in it’s place the direct link instead without needing to interact with the program at all, or to just do that manually yourself, it’s your choice.
Download FilePosted in Software Releases.
Tagged adf.ly, bit.ly, bypass links, C#, csharp, fb.me, fluxbytes, fluxbytes software, goo.gl, link redirect, lnk.co, ow.ly, owl.li, reut.rs, t.co, tiny.cc, up.ht
File Concealer v1.1
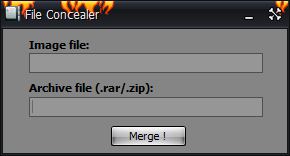
File Concealer is a simple and fun idea. What this allows you to do is to hide a .rar or a .zip file inside a picture file (tested a few common extensions like .jpg .png, .gif etc). After you merge the files the you will still be able to view the image like you normally would. But now you will also be able to right click and open it with winrar/or winzip, depeding on the file you used, to access the contents of the .rar you merged it with.
Usage:
Drag&Drop the files you want to use to the proper locations or click the boxes. Then just choose where to save the file and press merge.
Note:
There seems to be an issue sometimes where not all image types will work, regardless if they are the same extension. That is sadly OS/image related issues so there isn’t much we can really do about it. Same goes with the archive files. In my case I had more success using .rar files than .zip files.
Posted in Software Releases.
Tagged fluxbytes, fluxbytes software
List all Windows services in C#
I decided to make a tutorial to help the ones that were interested to learn how to go over the Windows services so they can either start/stop/pause them or just display them in a control. The code I’ll be showing is from a program I created with the purpose of listing all the services info in a listview control.
The first steps you will need to take is reference “System.ServiceProcess” which will allow us to use the ServiceController class and also add the following code on the top of our Form/Class:
1 2 | using System.ServiceProcess; using Microsoft.Win32; |
We start by declaring our ServiceController class and populating it with all the services that currently run in the system using .GetServices();
1 | ServiceController[] services = ServiceController.GetServices(); |
Then we need to use a foreach loop in order to go through all the services. For the sake of this tutorial I’ll be using only one try/catch, usually you will want more to display more accurate info based on what info you fail to retrieve, in this case if an error occurs the whole service won’t be added to the list.
1 2 3 4 5 6 7 8 9 10 11 12 | foreach (ServiceController service in services) { try { // Our code will go here } catch (Exception ex) { Console.WriteLine(ex.Message); } } |
It’s time to start populating our ListView columns. The columns we will be using is the services name/status/location/description. To do that we need to first declare a new ListViewItem that we will be using to add the information. The service name and status info are easy to obtained using the ServiceController class as follows:
Posted in C#.
Tagged C#, csharp, ServiceController, windows services, winforms
List Windows active processes in C#
Since some people were interested on how to get all the Window processes, I decided to make this tutorial. How you tailor it to your needs is up to you.
We start off by referencing System.Management and adding the following on the top of our Form/Class:
1 2 | using System.Management; using System.Diagnostics; |
Then we need to declare our main classes. In this case that would be ManagementClass and ManagementObjectCollection in order to help us loop through the active process. Note that this can also be done by Process.GetProcesses() but there is a limitation. Process.GetProcesses() can only see the same bit process as your .exe files. So using that mean we wont be able to see all the processes, hence why we are using the two classes I mentioned above instead.
1 2 | ManagementClass management = new ManagementClass("Win32_Process"); ManagementObjectCollection mCollection = management.GetInstances(); |
After that we need to create our foreach loop which will help us get the information for each process we find and also a new listviewitem which we will be adding to our listview at the end of the loop so we can see the results.
1 2 3 4 | foreach (ManagementObject process in mCollection) { ListViewItem newListViewItem = new ListViewItem(); } |
For the sake of this tutorial we will only be concentrating in the process id/name/location and finally the description.
Posted in C#.
Tagged C#, csharp, ManagementClass, ManagementObjectCollection, processes, snippet, tutorial, Win32_Process, winforms
New web hosting
We finally managed to move our website to a new web hosting provider. Everything should be working like before but if you find any missing links please report them to us so we can fix them ASAP.
Posted in Website News.
Tagged web hosting


